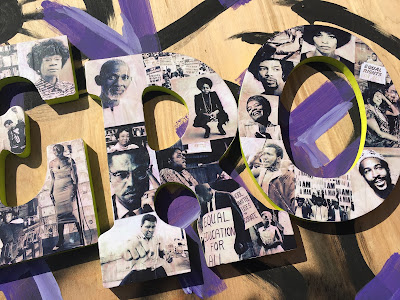
I absolutely love the way this turned out! It was really simple to do. Decide on your letter(s), pick out your photos, cut and glue! This is a nice way to add a creative wall display. I hung (will hang) mine over my door...It's just sitting up there at the moment, which isn't safe lol.
Here are some close ups of the letters...
Try it out!!
Materials
- Wooden letters (I purchased mine from Michaels)
- Spray paint/paint (optional: if you want the sides of your letters to have color)
- Pictures
- Fixative spray (for printed pictures that may bleed. I use Krylon Matte Finish Spray)
- Scissors
- Pencil
- Glue (I love Mod Podge)
Instructions
1. Turn letters face down, and spray paint/paint the sides if you want to add some color. I spray painted the sides and back of mine. Spray painting the back was a waste of spray paint because I'm hanging it on the wall, but...it looked better.
2. Print/Gather the pictures you will be gluing to your letters. Keep the size of your pictures and letters in mind. You don't want the pictures to be too big that you have to cut off important details. You also don't want them to be too small that they don't cover certain parts of the letter. I used the inch measurements at the top of my google drive document to size my images. You can also use sites like lunapic to resize images. I knew the width of my letters, so I just kept that in mind when resizing the pictures. I didn't get too scientific with it. I also printed a lot of pictures that I found online, so I had plenty to choose from.
3. If pictures are printed out, they may run once you put glue on top. I advise spraying them with a fixative first, which will set the ink and stop it from running. Follow the manufacturer's instructions for whatever fixative you use. I completely forgot this step, so once I glued my first photo, I noticed my Mod Podge started turning a faint pinkish/brownish color. I
4. Place letter (face up) on top of the picture (face up), and trace around it with a pencil. Cut it out. You can decide if you want to glue as you go along, or wait until you have all the images cut out. I waited til the end, so I could see it all before I glued. Follow the instructions for whatever glue you decide to use, as far as application and drying time. I use my fingers when applying Mod Podge...I like art to be messy lol. I also still enjoy peeling dried glue...and candle wax off my fingers.
 |
| Tracing outline of letter onto images |
 |
| Laid out pictures on top before gluing |
Once it dries, you're all done and you have an awesome new piece for the wall :)
Stay Inspired.


No comments:
Post a Comment